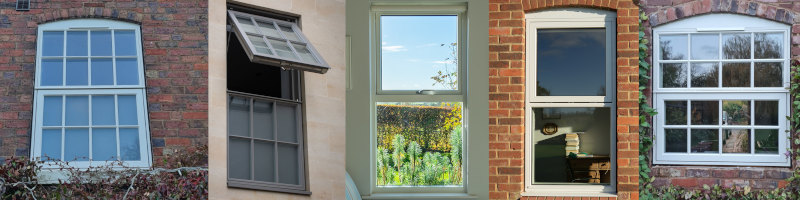
Replacing a Sliding Sash Window with an Opening Casement
Sliding sashes have an overall poor reputation and, for the most part, it’s well deserved. The entire premise of an opening section purely being able to move up and down in a single plane of movement is a flawed one: primarily, how it is possible for it to be sealed when closed? You can’t fit a proper rubber seal around the opening parts – rubber has high friction so you wouldn’t be able to open it. As a result, almost every sliding sash has a brush seal so that the sashes can rub against the brushes without getting stuck.
- There are two fairly clear problems here:
- Sliding something against a seal will wear down that seal, reducing its effectiveness every time the window is opened and closed
- Brushes have space between bristles to let air through, so a brush seal is not an airtight seal even before it’s worn down
Is there a good option?
In Denmark, Vrogum Solborg is an awesome sliding sash solution that involves proper rubber seals and a sliding mechanism that moves the opening sashes slightly in and out so that they don’t rub on anything as they move up and down. Very clever, very innovative and the result is the best possible airtight rating of Class 4. But (and we’re saying this as huge fans and sellers of Vrogum), they really are not cheap… It’s a perfect case of “you get what you pay for”.

For an equally-airtight, but less top-of-the-range option, we think it’s worth considering a relatively normal outward-opening casement.
Before we dive into this properly, please do bear in mind that you may not be allowed to do this if you’re living in a listed building or a conservation area. Please do check before you commit to buying anything that would change how your home looks!
Faux-Sash Design
Easiest, most popular and least likely to create a design-change argument: faux-sliders!
In its most simple form, a sliding sash is just two panes of glass sashes set within one overall window frame. So this can be copied regardless of how they open. Having a top-hinged casement placed above a fixed section often looks more than close enough. Most casement window options should be able to offer the same decorative bar designs, and some even will add the sliding sash horns onto the bottom of the upper half.

The important, often overlooked, factor to double check here is whether this change is going to ruin a fire escape route. If they’re the same size, sliding sashes will open wider than this faux-sash arrangement.
Complications of Removing Old Box Sashes
It’s probably blocked in from both sides
Removing an old sliding sash window is often far more difficult than any other type. Generally, you would aim to extract an old window by pulling towards you from the outside. This is normally a completely clear route out for the window, and doesn’t disturb any internal decorations such as plasterboard and window boards. However, traditionally, a sliding sash window is built in behind the outer layer of brickwork. In building terms, this is called a “check reveal”. This means that the sliding sash is sandwiched between internal and external layers, and that creates a frustrating choice: do you dismantle the entire internal surround (plaster, carpentry, ceilings,…), or put up scaffolding and start dismantling the external brickwork?
It’s not an easy choice, and the correct answer isn’t necessarily the same for multiple properties.
For a comparatively easy example: the image below is the corner of a newer plastic sliding sash, which is rendered into the building. Its overall size is therefore slightly larger than the external opening, and the render would need to be broken in order to take it out.

Quite Large holes in the sides might need to be filled in
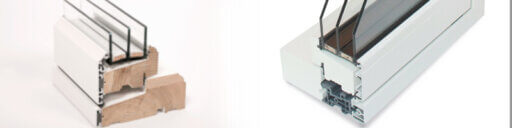
Assuming a choice has been made, and the old box sashes have been successfully removed, we encounter problem number two: old sliding sash windows have hollow timber box sections on both sides – these contain the lead weights which stop the sash falling down as soon as you let go, and these boxes are absolutely huge compared a normal window frame.
So the new window can’t just go straight into the hole left behind because there will be a massive gap on both sides: nothing for the window to be securely fixed into, and an airtightness nightmare. These holes should be filled and sealed up properly before the new window is installed.
It’s not uncommon for a very cheap and easy route to be taken here. We often come across the idea of leaving the large boxes in place, removing middle elements of the old slider and simply installing the new window up against the old box sections. It’s likely the home owner wouldn’t notice this visually (which is why installers try to get away with doing it), but it doesn’t take an expert in building practice to consider the implications of fixing a brand new window against that old bit of wood: a combination that was never designed to be airtight or watertight.

Obviously, putting everything back together
Thankfully, those two problems often mark the end. They just happen to be two fairly large and costly problems to rectify. Building up the external brickwork again obviously will require your builder to come back (unless you also used them to install the windows, which is really not a bad idea to limit trade-juggling and keep costs lower). And/or re-doing the internal reveals may require a carpenter, or a plasterer, or a decorator, or all the above in some cases.
Our main message here is please don’t underestimate the about of work to “just replace a window”! Walking into a room in your home to see plasterwork and carpentry cut off the wall, exposing the structure behind, can be a stressful thing to see for a lot of people. Hopefully, what we’ve explained hasn’t ruined your wish to update your sliding sashes, rather better prepare you for the work involved so that you can plan accordingly.
 Window installed before the walling is replaced
Of course, if some planned renovation work happens to involve stripping back the internal walls regardless – this is perfect time to sort out those old box-sliders to avoid going through the same process again in a few years.
Old sliding sash windows are almost always the worst-insulating item a home can have. So the awkward route to improve them properly is often worth the effort.
Contact us!
For any questions about our products and services, or to get your quote,
please get in touch by phone, email, or using our in-browser contact form!
Leamington: 01926 935 607
London: 0203 633 0476
E-mail : sales@enlightenedwindows.co.uk
Contact Form: Contact Us


Where to Start
Latest Blogs
Latest Galleries
